Tuesday, March 29, 2016

Kumamon Charcoal Cream Cheese Bread


Ladies and gentleman, introducing....Kumamon Bread! I have made this awhile back (got a little slow in writing about it), and this was my very first time making a bread from scratch. Not too shabby, huh? Although there were parts that I was not entirely happy with (which I will list down below), I have decided to cut myself some slack and just enjoy these adorable buns.

The recipe that I am using was adapted from the ever amazing Cho's daily cook 초의 데일리쿡 , with some personal twist to the ingredient, as usual. The moment I saw her instruction video on making these adorable bread, I knew that I have to make them ASAP (Though her's look so much better than mine, but hey she's the expert).

Konichiwa! 

The original recipe calls for squid ink as the colouring of the bread, but since I could not get my hands on those, I have replaced them with black Charcoal powder instead (I got mine from BMS Organics). Just mix 2 tablespoons of charcoal powder with the milk, and you will have a very efficient, not to mention, healthy black colouring.


After getting out from the oven and before decoration.

As I've said before, there were some parts that I was not entirely happy with, I shall list them down as a "note to self" for future reference.
  1. The dough could have risen more before going into the oven. I have rushed the process and put it in the oven too soon, which leads to a flatter bun as compared to the ones in the original recipe.
  2. The cream cheese filling could be a little more liquidy by adding a teaspoon of milk.
  3. I have put the bread in the oven for a tad bit too long, causing them to harden a little too much for my liking. (The insides were still soft, so yay) Stick to maximum 25 mins.
Despite the minor mistakes, the bread was nonetheless yummy, and hey, let's not forget that they are just oh so adorable! Without further ado, see recipe after photos, or watch cho's daily cook's detailed video for even clearer instructions!
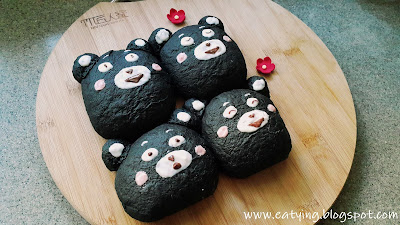
Too adorable!

Just having some fun with it (lol)


Kumamon Charcoal Cream Cheese Bread

Recipe adapted from Cho's daily cook, modified by Ashley Ooi
Adorable and healthy Kumamon Charcoal Cream Cheese Bread!

Ingredients:
  • 220g Bread Flour
  • 145ml Milk
  • 2 tbsp Charcoal Powder
  • 25g Butter
  • 5g Instant dry yeast
  • 20g Sugar
  • 3g Salt
  • 100g Cream Cheese
  • 12g Powdered sugar
  • a few drops Red food colouring
  • 30g White chocolate
  • 20g dark chocolate
Cooking Directions:
  1. Mix milk and charcoal powder.
  2. Mix cream cheese and powdered sugar as the filling. Set aside.
  3. In another bowl, mix strong flour, salt , yeast, butter, and the milk+charcoal mixture until it becomes a dough. Knead dough for 15~20 minutes until the surface is smooth.
  4. Place the kneaded dough in a bowl, cover with plastic wrap and let it ferment for 1 hour in a warm place (First fermentation).
  5. Punch the dough to let air out and divide the dough into 4 equal parts, and a small dough enough to make the ears. Cover and ferment for another 15 minutes (middle fermentation).
  6. Flatten the dough and add cream cheese filling.
  7. Place the bun in a square pan, cover and ferment for 30 minutes (Second fermentation).
  8. Preheat oven to 150℃
  9. Bake for 20~22 minutes in 150℃/302℉ oven.
  10. Decorate the bun with white chocolate and dark chocolate (see video for more detailed instruction).

 Love, 
Ashley

Friday, March 18, 2016

Recipe: Japanese Strawberry shortcake


Over the past few weeks, I have been on a hunt for strawberries. Back when I was living in the UK, it used to be so easy to get my hands on some good strawberries, with reasonable price too (and I do mean easy, I could get them right across the street!). Anyhow, now that I am back home, my cravings for those lovely jewel-like berries are getting harder to satisfy. Now don't get me wrong, we do have fairly good strawberries here, mostly imported, thus sky-high price and me emptying my wallet while damping the cashier counter with my blood and tears (lol I kid).

Thankfully, with much endurance, I was able to find some fairly priced and beautiful Korean Strawberries. They were not the biggest nor the most eye-catching ones, but hey, they were good enough for me. 


Finally!


Look, so pretty.

Oh, did I mention the reason for my strawberries hunting (?) was because I wanted to make a strawberry shortcake? Yeap, strawberry shortcake! I had tons of fun making the cake and even more fun eating it. I could say that I was making it to celebrate Valentines day with my family, but I'd be lyin' if I do. We do not need a reason to bake, we just bake it. Period. Anyways, enjoy the recipe and let me know what you think!

ps: The tin that I used for the three-tiered cake is a fairly small 12cm tin. I have poured the rest of the cake batter into another square tin but do note that this recipe is suitable for one 18cm cake tin.

Find recipe after the photos.


A basic Genoise cake


Fancy for a piece?

Strawberry Shortcake

A square-shaped strawberry shortcake with some chocolate shavings, equally delicious!


Japanese Strawberry Shortcake

Recipe by Ashley Ooi
Easy to bake and delicious Japanese Strawberry Shortcake.
Prep time: 30 minutes
Cook time: 30 minutes
Total time: 1 1/2 hours (including decorating time)

Ingredients

The Genoise cake:
  • 115g Cake Flour
  • 3 Eggs
  • 120g Granulated sugar
  • 30g Unsalted butter
  • 1 tsp Vanilla extract
  • 45ml Milk
Syrup:
  • 30g Granulated sugar
  • 15g Water
Fresh Cream:
  • 500ml Whipping Cream
  • 50g Granulated sugar
Decorations:
  • 20 Medium-sized Strawberries
  • 1 tbsp Apricot jam
  • 1 tsp Water
Steps
  1. Preheat the oven to 175°c. Line the cake tin’s base with parchment paper. 
  2. Sift the cake flour and set aside.
  3. In the mixing bowl, add eggs and sugar and beat with an electric hand mixer over a boiling pot of water until they are melted.
  4. Remove bowl from the water and continue whisking until the admixture turns creamy-white color and has a silky texture.
  5. Add sifted flour and fold into the mixture. Add butter, warm milk and vanilla extract and mix them well. 
  6. Pour the batter into the prepared tin and bake for 30 minutes until cooked. To test if the cake is well cooked, stab a toothpick or chopstick into the cake. The cake is done if it comes up dry.
  7. Remove cake from the tin without peeling the baking paper off. Set aside to cool.
  8. To make fresh cream, whisk whipping cream and sugar using an electric mixer until stiff peaks form.
  9. Slice top of the cake off. Divide it into two layers. Place the first layer on a cake stand. Brush syrup on top of the cake.
  10. Spread whipped cream on top of the cake and fill the cream layer by placing the strawberry (cut into 1cm) on  top. Spread whipped cream over the strawberries again.
  11. Repeat the steps for the second layer of cake.
  12. Frost the whole cake with whipped cream. Decorate the cake with whole strawberries. Refrigerate for at least 2 hours to set the cream.
  13. Serve in pieces and enjoy! 


Love, 
Ashley
 

Eat-Ying Template by Ipietoon Cute Blog Design